Ez On Products
100SMU, Ez-On Seat Mount for All Bus Seats

- SKU:
- 100SMU
- Shipping:
- Calculated at Checkout


Description
- 100SMU
- WARNING! This restraint must only be used on school bus seats
- Fits All Bus Seats
- Easy No Drill installation
- For passengers weighing 31 – 168 lbs
- Meets FMVSS213
- Use Only with EZ-ON compatible vests
- Use on school bus seats that have entry between the seat bottom and the seat back
- Passengers seated behind occupants with Seat Mount must be wearing a seat belt, a transportation vest, or must be unoccupied
- Register this Seat Mount to be notified of a safety recall
- Recommended replacement after 6 years
- Warranty: Repair or replace product defects for 1 year from manufacturer date
Compatible Vests: 103Z, 203PB, 403PB
Ez-On Adjustable Zipper Vests
Ez-On Mounting Options
Cross#: 13-EZ-M100S
Previous Part#'s: 100SM, 100SNY
Warning
Death or serious injury can occur if manufacturer’s instructions are not followed correctly. All EZ-ON Products are dynamically tested to meet NHTSA standards. Please follow washing instructions on product tag. Replace product if it is damaged, frayed or has been in a crash. Recommended replacement after six years. EZ-ON Products are not liable for injury if these recommendations are not followed.
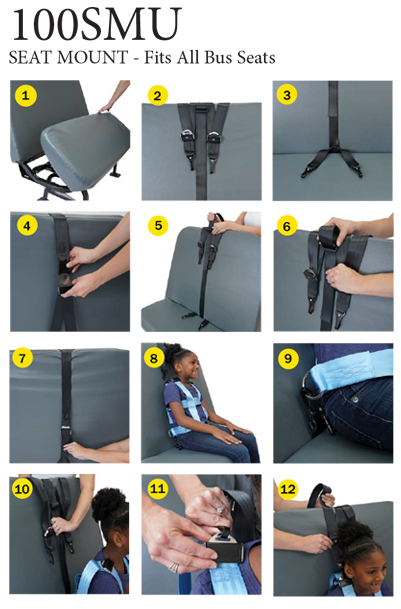
Installation Instructions
- Unlock seat and lift up
- Hang adjustable hooks from top of seat
- Close bus seat. Make sure non-adjustable hook ends are extending on seat bottom
Note: Securely lock seat bottom in place - Connect push button
Note: Face of Push Button should be against the bus seat back - Adjust length of seat wrap so that the bar slide is at the top of the bus seat, and non-adjustable hook ends are extending approximately 2 inches on seat bottom
- Back thread loose end of webbing through bar slide
- Pull webbing tight at the push button. Mount strap must be tight without slack
Note: Webbing should be tight enough to create a crease on the top of the bus seat - Properly seat passenger
Note: Hips low against the back of the seat and shoulders flush to the seat - Attach the non-adjustable tether hooks to the “D” rings located at the hip level of the seating passenger’s vest
- To shorten or lengthen the hip tether hooks, rotate seat mount
Note: Passenger should not be able to move bottom more than 2 inches forward - Attach adjustable hook ends to tether slots on the shoulder adjusters on the vest
- Tighten strap by pulling webbing through the tilt lock adjuster
Note: Repeat steps 11 – 12 for second shoulder strap
Warranty Information
Warranty: Repair or replace product defects for 1 year from manufacturer date
View AllClose
Videos Hide Videos Show Videos

Related Products


100M2SMU, Ez-On Seat Mount for Max-2 Vests
Ez On Products
MSRP:
$124.00
Now:
$117.00
Was:
$124.00
100M2SMU
Universal Seat Mount for Max vests
WARNING! This restraint must only be used on school bus seats
Use only with EZ-ON Max 2 Vests
Easy no drill installation
For passengers 31-168...

717, Bus Vinyl Seat Patch with Brush Applicator
PDI
MSRP:
$42.78
$42.48
717
Bus Vinyl Seat Patch with Brush Applicator
12 oz. can
Temperature use range: -10°F to 200°F
Easy to use: The air-dry formula dries clear & blends with all colored vinyl
Repairs made...

3785575C1, IC Blue Lap Belt - Passenger
Misc
MSRP:
$26.95
Now:
$18.95
Was:
$26.95
3785575C1
IC Blue Lap Belt - Passenger
Student lap belt for newer IC buses
Has special brackets for IC seat frame
Seat Belts


PB301-90, Shield 90" Black Permanent Mount Seat Belt
Shield
MSRP:
$34.25
Now:
$26.20
Was:
$34.25
PB301-90
90" Seat Belt
Permanent Mount
Black
Buckle-Up - Red on White with Seat Belt in Black - 8" x 4": UB117


103Z-L, Ez-On Adjustable Ez-On Large Vest
Ez On Products
MSRP:
$90.00
Now:
$87.00
Was:
$90.00
103Z-L
Adjustable Zipper Vest - Large
For School Bus Use Only
Does NOT come with a Crotch Strap - but are available as a Special Order
Rear Zipper Closure with 3 Zipper options
Adjustable...